How To Regrout Tile Without Removing Old Grout?
Tile surfaces add a touch of elegance and functionality to our homes, but over time, the grout that holds them together can show signs of wear and tear. Cracked, discolored, or deteriorating grout not only detracts from the overall aesthetic of your tiles but can also compromise their structural integrity. While many may assume that the only solution is to remove and replace the old grout painstakingly, there’s a less labor-intensive and cost-effective alternative: regrouting without removing the old grout.
In this comprehensive guide, How To Regrout Tile Without Removing Old Grout? we will explore the art of regrouting tile without the arduous task of grout removal. This method saves time and effort and can breathe new life into your tiled surfaces, making them look as good as new. We will walk you through the entire process, from understanding the purpose of grout and signs of deterioration to choosing suitable materials and executing the regrouting strategy with precision. With the right tools and techniques, you can give your tiles a fresh lease on life without breaking the bank.
What Is Grout And Its Purpose?
Grout is a cementitious or epoxy-based material used in various construction and tiling applications. Its primary purpose is to fill the gaps, joints, and spaces between tiles, ensuring a stable, durable, and aesthetically pleasing surface. Grout serves several essential functions in tile installations:
- Joint Filling: Grout fills the gaps between tiles, preventing debris, dirt, and moisture from infiltrating the spaces beneath the tiles. It acts as a barrier to protect the subfloor or wall structure.
- Structural Support: Grout adds structural support to the tiled surface by binding individual tiles together. This helps distribute loads and minimize the risk of tile breakage or movement.
- Aesthetic Enhancement: Grout plays a crucial role in the overall appearance of tiled surfaces. It can enhance or detract from the tiles’ visual appeal, depending on factors like color and cleanliness.
- Waterproofing: Depending on the type of grout used, it can offer waterproofing properties, making it suitable for moist areas, such as bathrooms, kitchens, and swimming pools.
- Flexibility: Grout is slightly flexible, allowing for a small degree of movement without causing damage to the tiles. This is particularly important in areas subject to temperature variations and structural shifts.
- Tile Alignment: Grout helps maintain uniform spacing and alignment between tiles, ensuring a professional and polished finish.
Grout is available in various types, including cement-based grout, epoxy grout, and urethane grout. The choice of grout type depends on the project’s specific needs, with considerations for factors like tile material, location, and the desired aesthetic outcome. While grout is vital for the functionality and longevity of tiled surfaces, it can deteriorate over time due to wear, moisture, or improper maintenance. When grout shows signs of deterioration, regrouting without removing the old grout can be a practical and cost-effective solution to refresh your tiles and restore their original beauty.
Can You Regrout Over Existing Grout?
Yes, you can regrout over existing grout in certain situations. Regrouting over existing grout is a practical solution when the old grout is still structurally sound and shows only surface-level wear, such as discoloration or minor cracks. This approach is beneficial when you want to refresh the appearance of your tiles without the time-consuming and labor-intensive process of completely removing the old grout.
Signs Of Deteriorating Grout
Deteriorating grout can compromise the integrity and appearance of your tiled surfaces. RecognizingRecognizing the signs of grout deterioration is essential for timely maintenance and preservation of your tiles:
- Cracks: Cracks in grout lines are one of the most common signs of wear. They can allow moisture to penetrate beneath the tiles, leading to potential damage to the substructure and loosening of tiles.
- Discoloration: Over time, the grout may become discolored due to mold, mildew, or dirt buildup. This not only detracts from the visual appeal of your tiles but also indicates a loss of grout’s protective qualities.
- Missing Grout: If portions of grout are missing or eroded, it leaves gaps between tiles, making them vulnerable to movement and damage. These gaps can also collect dirt and debris.
- Softness and Crumbling: Deteriorating grout may feel soft or crumble when touched. This indicates a loss of structural integrity and protection, necessitating repair or regrouting.
- Water Infiltration: If you notice water seeping into the grout lines, it’s a clear sign of deterioration. This can lead to more significant issues, such as mold growth, and should be addressed promptly.
- Loose Tiles: As grout deteriorates, it loses its ability to hold tiles securely. If you observe tiles that wiggle or are partially detached, it indicates grout deterioration.
Tools And Materials
Before you embark on the regrouting process, gathering the necessary tools and materials is essential. Here’s a comprehensive list of what you’ll need:
- Grout: Choose a high-quality grout that matches your tile and project needs. Depending on your specific requirements, you can opt for cement-based grout, epoxy grout, or urethane grout.
- Grout Saw or Grout Removal Tool: If areas of severely deteriorated grout cannot be salvaged, you might need a grout saw or removal tool to clean out these sections.
- Grout Float: This tool applies and presses the new grout into the gaps between the tiles.
- Grout Sponge: A grout sponge is essential for cleaning excess grout from the tile surface during application.
- Bucket: You’ll need a bucket for mixing the grout to the right consistency.
- Trowel: A trowel helps with mixing the grout and spreading it evenly.
- Dust Mask and Safety Glasses: It’s crucial to protect yourself from inhaling dust and debris during grout removal and application.
- Gloves: Wear gloves to protect your hands from the grout mixture and any chemicals used.
- Masking Tape: Use masks to protect adjacent surfaces or areas where you don’t want grout to spread accidentally.
- Tile and Grout Cleaner: A tile and grout cleaner is handy for prepping the area and removing any existing dirt or residues.
- Grout Sealer: After regrouting, sealing the new grout is vital to protect it from staining and moisture infiltration.
- Rags or Paper Towels: Keep these on hand for general cleanup.
- Small Brushes or Toothbrushes: These can clean hard-to-reach areas or corners.
- Plastic Mixing Spatula: A spatula can help mix grout and apply it precisely.
- Level or Straightedge: This tool ensures your new grout lines are classy and even.
- Buckets of Water: Have a couple of buckets of clean water for rinsing your grout sponge and tools.
How To Regrout Tile Without Removing Old Grout?
Preparing The Area
Properly preparing the area is a pivotal initial step in regrouting without removing the old grout. To start, ensure that the tile surface is immaculately clean. Use a tile and grout cleaner to remove dirt, grime, and existing residues, providing a fresh canvas for the new grout. Once cleaned, thoroughly rinse the area and let it dry. Next, conduct a close inspection of the existing grout lines.
Look for any loose or damaged grout that may need removal and replacement. A grout saw or removal tool may be necessary if you find severely deteriorated grout. Finally, protect adjacent surfaces, fixtures, or walls by using masking tape to prevent accidental spills or grout splatters, ensuring that the regrouting process proceeds neatly and without causing unwanted damage to the surrounding areas. Properly preparing the place sets the foundation for a successful and effective regrouting job.
Choosing The Right Grout
Selecting the appropriate grout is a pivotal decision in the regrouting process. The type of grout you choose depends on the specific requirements of your project. Cement-based grout is a versatile option, suitable for various applications. Epoxy grout offers excellent durability and waterproofing properties, making it ideal for moisture-prone areas. Urethane grout is known for its flexibility and stain resistance.
Additionally, consider the color of the grout, as it significantly impacts the final look of your tiled surface. You can match the existing grout color or opt for a new one to create a fresh appearance. Lastly, decide between pre-mixed and powdered grout based on your experience level and the project’s size. Careful consideration of these factors ensures that the grout complements your tiles and meets the requirements of your regrouting project effectively.
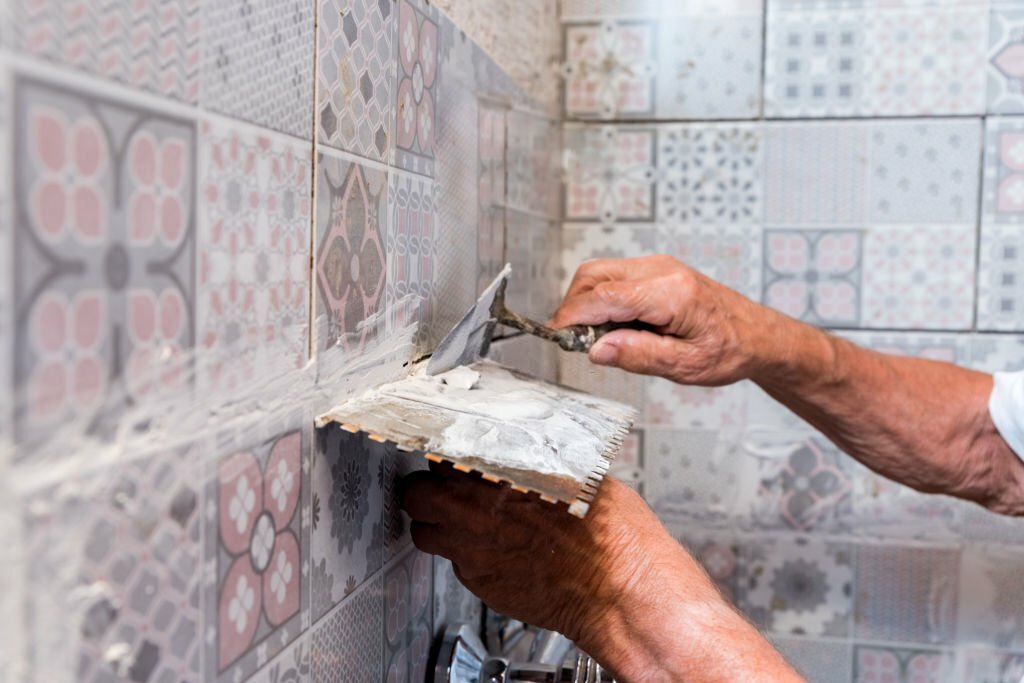
Regrouting Process
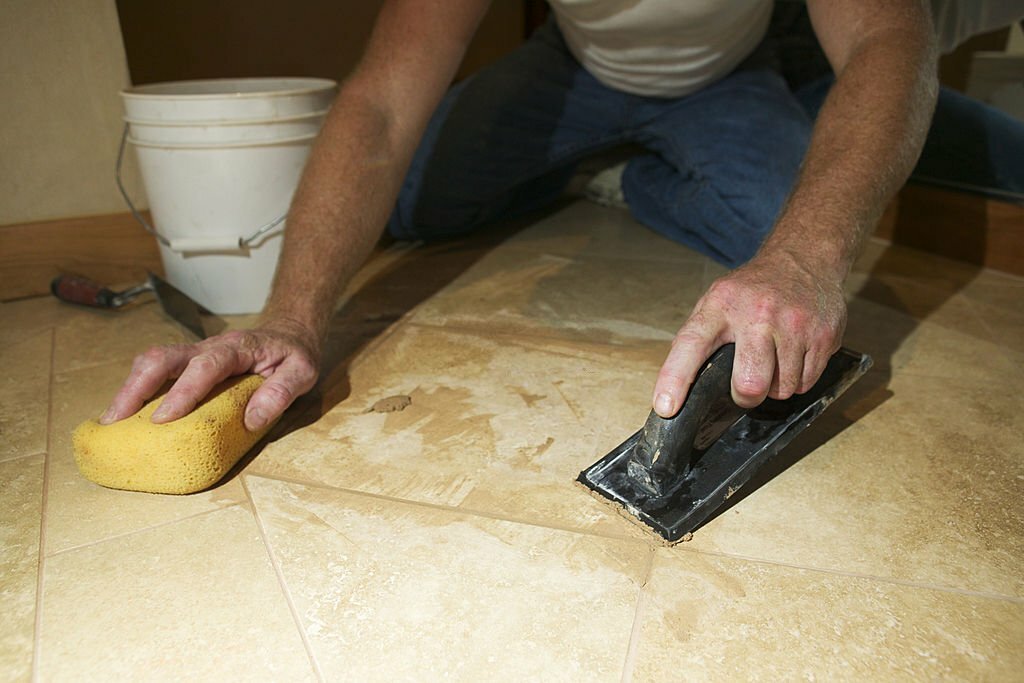
The regrouting process systematically revitalizes your tile surfaces without the labor-intensive task of removing old grout. After preparing the area by cleaning the tiles, inspecting the grout, and protecting adjacent surfaces, the next step is to mix the new grout to the right consistency, following the manufacturer’s guidelines. Using a grout float, apply the new grout over the existing grout lines, pressing it firmly into the gaps between the tiles.
To ensure evenness and a professional finish, you can smooth and level the grout lines with the grout float or a straightedge. Afterward, remove excess grout from the tile surface with a grout sponge and rinse your tools thoroughly. Allow the grout to cure for the recommended time, and once it’s fully set, consider applying a grout sealer to protect it from stains and moisture. This process leaves your tiled surfaces looking refreshed, rejuvenated, and structurally sound, all without the need to remove the old grout.
Final Touches
As you near the completion of the regrouting process without removing the old grout, it’s essential to pay attention to the final touches that will elevate the outcome of your tile renovation project. After the new grout has fully cured, typically within 24 to 72 hours, the last steps involve sealing the grout. Applying a grout sealer not only enhances the durability of the grout but also safeguards it against staining and moisture infiltration.
Additionally, once the sealer is dry, you can buff and shine the tiles to reveal their renewed brilliance. These final touches ensure that your regrouted tiles not only look pristine but also remain protected against the wear and tear of daily use, leaving your tiled surfaces with a refreshed, polished, and long-lasting finish.
Tips For Success
To ensure a successful regrouting project without removing old grout, consider these valuable tips:
- Thoroughly Prepare: Take your time during the preparation phase, including cleaning and inspecting the area. This sets the foundation for a smooth regrouting process.
- Choose Quality Grout: Invest in high-quality grout that suits your project’s specific needs, whether for a bathroom, kitchen, or another area. Selecting the right type and color is essential.
- Proper Mixing: Follow the manufacturer’s instructions when mixing the grout to ensure consistency. Properly mixed grout provides a strong bond.
- Precision Application: Apply the new grout carefully, pressing it into the gaps between tiles and ensuring the lines are even and consistent.
- Work in Sections: Regrout your tiles in manageable sections rather than attempting the entire surface simultaneously. This approach lets you maintain control and ensures the grout stays dry quickly.
- Clean as You Go: Regularly clean excess grout from the tile surface as you work to prevent it from hardening and becoming difficult to remove.
- Sealing: Remember to seal the new grout once fully cured to protect it from moisture and stains. This step is vital for long-term durability.
- Patience: Allow the grout sufficient time to cure per the manufacturer’s recommendations before exposing the tiles to moisture or heavy use.
How To Maintain And Clean Grout?
Maintaining and cleaning grout is essential to preserve the integrity and appearance of your tiled surfaces. To keep grout in good condition, regular cleaning is key. Begin by mixing a solution of equal parts water and white vinegar or a mild detergent. Apply this mixture to the grout lines and let it sit for a few minutes. Then, scrub the grout using a soft-bristle brush or an old toothbrush to remove dirt and stains. Rinse the area with clean water and dry it thoroughly. To further protect the grout, consider applying a grout sealer every 6-12 months, which helps prevent staining and moisture penetration. These simple maintenance steps can extend the life of your grout, keeping your tiles looking fresh and clean for years to come.
FAQs
Are Grout Pens Any Good?
Grout pens can be practical for quickly refreshing and revitalizing grout lines in the short term.
How Long Do You Leave The Grout Pen On Before Wiping?
Allow the grout pen to dry for 5-10 minutes before removing excess or residue.
What Happens If You Don’t Regrout?
If you don’t regrout, deteriorating grout can lead to water damage, mold growth, and structural issues in the long run.
What Is An Alternative To Regrouting Tiles?
An alternative to regrouting tiles is to use epoxy or acrylic grout colorant to refresh the grout’s appearance without fully regrouting.
Is Regrouting Hard To Do?
Regrouting can be a moderately challenging DIY project, requiring careful preparation and attention to detail.
Conclusion
Regrouting tile without removing old grout is a practical and cost-effective method to rejuvenate your tiled surfaces, provided the existing grout is structurally sound. With the right tools, materials, and techniques, you can transform the appearance of your tiles and extend their lifespan. By following the steps outlined in this guide, you can achieve a successful regrouting project, preserving the beauty and functionality of your tiled spaces and ensuring they continue to shine for years to come. Don’t let deteriorating grout detract from the charm of your tiled areas—take action and regrout to bring back your tiles’ luster and structural integrity.


Monique Valeris
Monique Valeris is a prominent house editor with a keen eye for design and a passion for creating warm and stylish interiors. With a wealth of experience and a fresh perspective, she blends contemporary trends with timeless elements to create aesthetically pleasing and functional spaces. Valeris's editorial contributions extend beyond the printed page, engaging with her audience through various platforms to share insights and tips. Her ability to effortlessly blend different design styles and her dedication to promoting inclusivity within home aesthetics set her apart as a leader in the field.